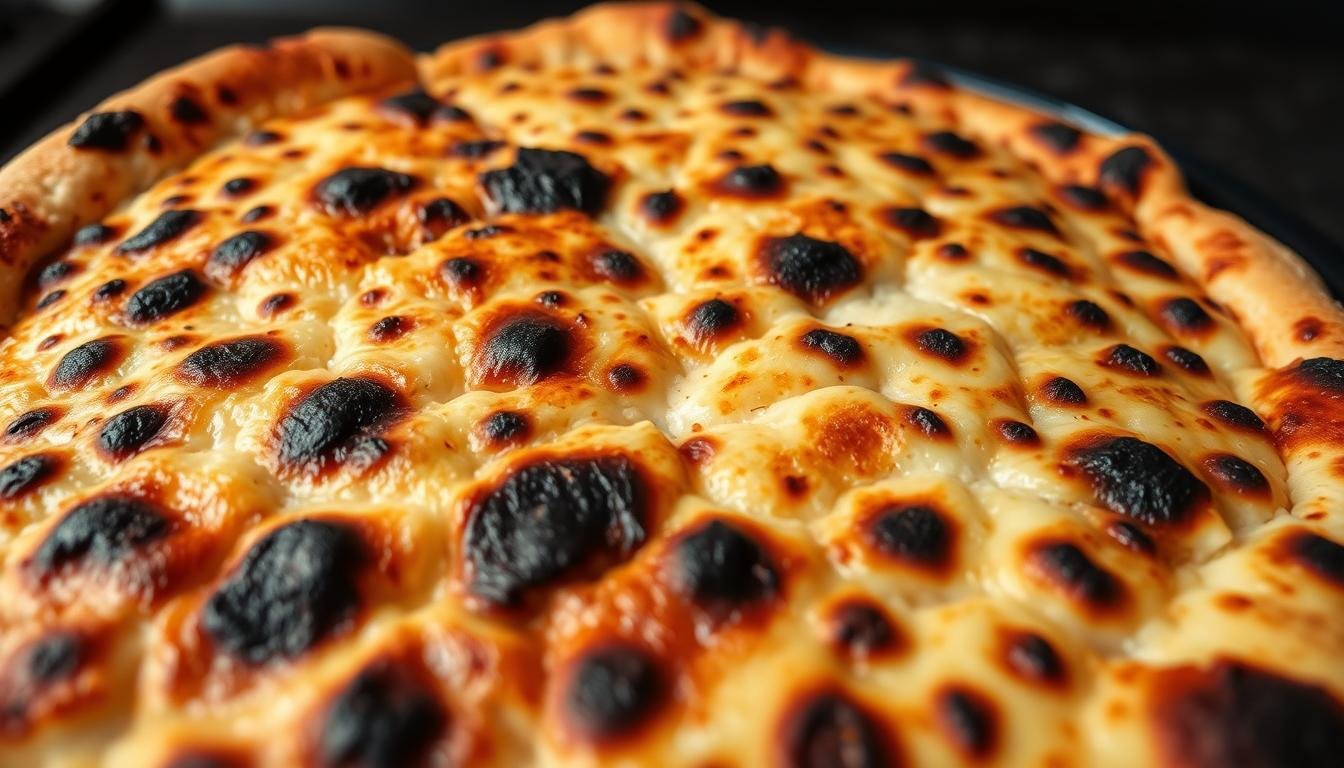
5 Sourdough Pizza Dough Secrets for Perfect Char
Making the perfect pizza at home feels magical. Every time my oven gives me a crispy sourdough pizza, it’s a win. It’s exciting, turning flour and water into deliciousness. Plus, a bit of skill and patience adds fun. Whether you’re experienced or new, these sourdough pizza dough secrets can up your pizza game.
At the start, getting that perfect pizza char seemed hard. But every pizza I made taught me something new. Ready to learn how to make your pizzas stand out? Let’s start!
Key Takeaways
- Learning sourdough pizza dough secrets improves your homemade pizza.
- Right water levels help get that perfect pizza char.
- Looking after your sourdough starter makes the dough tasty and light.
- Good fermentation makes your crust better in taste and texture.
- Knowing how to mix and shape means a crispy, tasty pizza base.
Understanding Sourdough Pizza Dough Fundamentals
If you love pizza, let’s learn about sourdough pizza dough! We will look at what makes this dough unique, its benefits, and the key ingredients needed.
What is Sourdough Pizza Dough?
Sourdough pizza dough uses wild yeasts and bacteria for rising. This process gives the dough a unique tang and complex flavor. It results in a chewy, slightly sour crust—truly special!
Benefits of Using Sourdough
There are many benefits to sourdough pizza. It’s easier to digest and its slow fermentation boosts flavor and texture. This makes the pizza healthier and more delicious.
Key Ingredients for Success
To make outstanding sourdough pizza dough, know your ingredients. A strong starter is vital—it’s your dough’s heart. Correct flour-to-water ratios ensure the dough’s perfect texture. Don’t forget quality sea salt and top-notch olive oil for flavor and richness. Together, they create an unbeatable crust!
The Importance of Hydration Levels
When making the best sourdough pizza, it’s key to know about dough hydration levels. Understanding hydration helps you bake better.
What is Dough Hydration?
Hydration means the water amount versus flour in dough. For example, 500 grams of flour and 350 grams of water means 70% hydration. This ratio affects the dough’s behavior and shapes your pizza crust’s texture.
How Hydration Affects Texture
A higher hydration level makes the dough soft and stretchy. This leads to a lighter sourdough pizza dough texture. This makes those big bubbles in the crust!
Yet, lower hydration gives you a tougher, chewier crust. Finding the right mix is essential. Here’s how it works:
| Hydration Level | Texture | Handling |
|---|---|---|
| Low (55-60%) | Dense & Chewy | Firm, Easy to Shape |
| Medium (61-70%) | Soft & Airy | Moderately Sticky, Easy to Form Bubbles |
| High (71-85%) | Light & Very Airy | Very Sticky, Requires Skillful Handling |

Adjusting Water for Your Environment
Your location changes how dough acts. Humidity and temperature play big roles. In humid places, use less water to prevent sticky dough. In dry areas, add a bit more water to get it right. Adjust to fit your area for that perfect sourdough pizza dough!
Mastering Sourdough Starter
Do you want the best sourdough pizza? A strong sourdough starter is key! Let’s explore how to make and keep this special ingredient for the best crust.
Building a Strong Starter
Starting your sourdough begins with flour and water. It catches wild yeast and bacteria to ferment. I start with whole grain flour; it’s full of good stuff to begin fermenting.
Remember, being patient is important! Nature needs time to do her work.
Feeding and Maintaining Your Starter
Got your starter? Now it’s time to care for it! Keep feeding it flour and water equally. I feed mine every day at the same time. It’s all about being consistent!
By keeping a regular schedule, your starter will be ready for baking. These sourdough starter tips are key for success.

Signs of a Healthy Starter
How do you know if your starter is healthy? Look for a nice, slightly sour smell, bubbles, and it should double in size in 4 to 6 hours after feeding. If you see these signs, great job! Your starter is ready for making yummy sourdough pizza dough.
Mixing Techniques for Optimal Dough
Mixing dough the right way is key for a great sourdough pizza base. We’ll look at the top dough mixing methods for a super stretchy and tasty crust!
The Autolyse Method Explained
One of my top dough mixing methods is the autolyse method. First, you just mix flour and water, then let it sit before adding yeast and salt. This method boosts gluten making without more kneading. It makes the dough stretchier and less likely to rip when shaping.

Incorporating Ingredients Smoothly
Adding ingredients smoothly is another key to great dough. After autolyse, you mix in the rest, making sure everything spreads out evenly. This even spread is crucial for the same taste and texture in every slice. Good mixing makes sure your dough acts as expected when it ferments and bakes.
Importance of Folding in Dough Development
Folding sourdough pizza dough is a must-do. Folding during fermentation makes the gluten stronger. This means it can hold more gas from the yeast. This leads to a dough that rises well and has a lovely, airy inside. By getting these techniques right, from autolyse to smooth mixing and folding, you’re on your way to making perfect pizza dough!
Fermentation: Time and Temperature
Getting the fermentation time and temperature right is key for the perfect sourdough pizza dough! Are you ready to explore the world of bulk fermentation and dough cold fermentation for that perfect crust?
Understanding Bulk Fermentation
The magic starts with the sourdough fermentation process! This is when the dough changes greatly, becoming light and fluffy. It rests and rises until it’s about twice its size. Watching the dough closely ensures it grows just right.

Retarding the Dough for Flavor
Ever wonder why some pizzas taste so rich? It’s because of dough cold fermentation. When you cool the dough, fermentation slows. This lets the flavors build up more. Try leaving your dough in the fridge for a night or even up to 72 hours for a rich taste.
Recognizing Fermentation Readiness
Knowing when your dough is ready is important. Look for signs like doubling in size, a domed surface, and an indentation that stays when poked. These signs mean you can start shaping your pizza!
Using the sourdough fermentation process will make your homemade pizza dough a true wonder, with the perfect mix of texture and flavor. Enjoy your cooking!
Shaping Techniques for Pizza Dough
Shaping sourdough pizza dough is an art. It turns hard work into a round, airy crust. This crust is then ready for your favorite toppings! Let’s look at how to shape the dough and keep its air bubbles.
Pre-shaping vs. Final Shaping
Pre-shaping starts the perfect pizza journey. First, gently put the dough on a floured space after fermentation. By folding the edges toward the center, you create a tight surface. This makes the dough easy to shape later.
For the final shape, stretch the dough softly into a round shape. Be careful not to work it too much.
Tips for Maintaining Air Bubbles
A light, airy crust makes a great sourdough pizza. To keep the air bubbles, touch the dough as little as you can. Don’t press or knead it hard when shaping. Just dimple it gently with your fingertips and stretch it out softly. This keeps the gas pockets from fermentation, making your crust light and crispy.
Achieving a Round Shape
Getting a round shape can be hard, but practice helps. Start by pressing the dough into a flat disc. Use your hands to stretch and turn it round. Let gravity stretch the dough by holding one edge. Move smoothly to keep the shape without losing the dough’s structure.
With these techniques, you’ll master sourdough pizza dough. You’ll make pizzas that look and taste amazing!