Braising 101: A Beginner’s Guide
Have you ever wondered how tough cuts of meat become so tender and packed with flavor? That’s the magic of braising.
Welcome to Braising 101, a guide for anyone wanting to learn this cookery art. Braising is a mix of wet and dry heat cooking. It turns basic ingredients into amazing meals. It’s good for anyone wanting to improve their cooking or learn braising. We’ll show you how to start with braising and get great at it.
Braising takes 1.5 to 3 hours, but you don’t have to watch it the whole time. You can use this time to do other things. It’s great for tough, cheap meat, making it very tasty. With a HexClad pan that can be used in the oven, you can easily move from stovetop to oven.
Braising isn’t just for meat. You can also braise vegetables, making this method perfect for vegetarians. Using cuts with bones adds more flavor. Searing meat first adds a crispy, tasty crust. Are you ready to learn how to braise and make your meals better?
Key Takeaways
- Braising combines wet and dry heat for tender, flavorful results.
- Cooking time ranges from 1.5 to 3 hours, mainly hands-off.
- Ideal for tougher, cost-effective cuts of meat.
- Seared meat develops a flavorful crust before braising.
- Vegetarian braising options include hearty vegetables.
- HexClad pans, oven safe up to 500 degrees, are excellent for braising.
What is Braising?
Braising is a cooking method that uses both dry and wet heats. It makes tough meat tender and tasty. It’s great for cheaper cuts of meat and is loved by cooks everywhere. This method cooks meat for 1.5 to 3 hours, mostly without needing your attention. This lets you do other things while cooking. Understanding what is braising can really improve your cooking.
Definition of Braising
To braise meat, you first sear it at high heat to make it flavorful. Then, you cook it slowly in a bit of liquid, like wine or stock. The meat soaks up to 75% in the liquid, which makes it really moist and tasty. This method works well for both meat and vegetables. For example, lamb shanks in Merlot wine taste amazing.
How Braising Differs from Other Cooking Methods
Braising is different from stewing and roasting. With braising, meat is not fully covered in liquid. This lets meat steam and simmer at the same time. Roasting uses dry heat and has no liquid. Braising keeps meat moist and very tender by cooking slowly.
This way of cooking is especially good for meats with bones, like osso buco. The bones make the liquid richer. It also works great for vegetables, like baby bok choy, changing their taste beautifully. Braising is good for many diets.
Essential Braising Techniques
Learning braising techniques makes your food tastier and richer. You should know three main steps: searing meat, cleaning the pan, and cooking slowly. These steps help make meals juicy and full of flavor.
Searing for Flavor
Searing meat is the first key step. It involves browning the meat on all sides in a hot pan. This step makes a tasty crust and deepens the flavor. Make sure the meat is dry for the best sear.
The Art of Deglazing
Next, how to deglaze the pan matters a lot. This means adding liquid like wine or stock to the pan. Then, you scrape up the browned bits from the meat. This step adds more taste to your dish.

The Importance of Low and Slow Cooking
Last, is the slow cooking part. This is when you let the meat cook gently in liquid. It makes the meat tender by breaking down tough parts. The cooking can take 1.5 to 3 hours. In this time, the meat soaks up all the good flavors.
| Braising Benefits | Details |
|---|---|
| Cook Time | 1.5 to 3 hours |
| Meat Texture | Fall-off-the-bone tender |
| Cleanup | Minimal, usually one pan or Dutch oven |
| Cost Efficiency | Effective with less expensive cuts of meat |
| Portion Size | Ideal for feeding a crowd |
Using these braising steps will make your cooking stand out. Try different meats and flavors to see what you like best. It’s a simple way to make amazing meals.
Choosing the Right Cut of Meat
When picking meat to braise, knowing which cuts work best is key. Braising makes tougher cuts tender and tasty. It cooks them slowly for one and a half to three hours.

Best Cuts for Braising
Finding the best meats for braising is vital for a great meal. Cuts like beef brisket, pork shoulder, and lamb shanks become tender with slow cooking. These cuts are less costly and full of flavor, perfect for big meals.
Braising cuts should be well marbled. This fat makes the meat tastier. Bone-in options, like shank or short ribs, add extra flavor from the bone marrow.
Factors to Consider When Selecting Meat
Consider these when choosing meat for braising:
- Fat Content: Fat adds flavor, but too much can be greasy.
- Collagen Levels: High collagen makes meat tender when braised.
- Meat Freshness: Beef should be bright red with a sweet smell. Pork should be fresh pink without bad odors.
- Marbling: Better marbling means tender, flavorful meat.
In Chicago, the meat-packing scene stresses picking top-quality cuts. Fresh Farms Market offers many meats, providing the best for braising. Using the right cut and cookware like the HexClad Deep Saute Pan makes cooking exciting.
| Type of Meat | Best Cuts for Braising | Key Attributes |
|---|---|---|
| Beef | Brisket, Chuck Roast, Short Ribs | High in Collagen, Well-Marbled |
| Pork | Shoulder, Belly | Fatty, Dense Connective Tissue |
| Lamb | Shanks, Shoulder | Bone-In, Rich in Flavor |
Choosing the right cuts is key to braising’s magic. It turns simple meat into something special. It’s not just cooking; it’s an art anyone can learn.
The Importance of Liquid
The right liquid is key for a good braise. It makes meat tender and keeps it juicy. Knowing which liquid to use and how to flavor it is important.
Types of Liquids to Use
Choosing the right liquid for braising is crucial. A bit of liquid can make food steam and stew at the same time. This is unlike stewing, where food soaks in liquid for a while.
- Broth or Stock: Great for chicken and pork, it adds a nice flavor base.
- Cooking with Wine: Perfect for beef and lamb, it brings out rich flavors and makes meat tender.
- Aromatic Liquids: Filled with herbs or spices, they’re great for veggies like kale.

How to Build Flavor in Your Braising Liquid
Creating tasty braising liquids means choosing and mixing ingredients well. Here are some tips:
- Searing the Meat: This locks in juices and adds flavor.
- Deglazing the Pan: Do this after searing. It adds richness by lifting browned bits.
- Incorporating Aromatics: Onions, garlic, and herbs make your dish more complex.
- Adjusting Seasonings: Use salt and pepper well to bring out flavors.
How often you baste impacts flavor and texture. Braising needs less basting than roasting, but timing is key.
By knowing these tips, you can make tasty and tender meals from simple ingredients.
Aromatics and Seasonings
Braising turns simple ingredients into rich dishes. Braising aromatics and braising seasonings boost flavor. They make every meal taste better.

Common Aromatics for Braising
Onions, garlic, and carrots are key for braising. They slowly add flavor, enriching the dish. The French mirepoix uses onions, carrots, and celery.
The Italian soffritto and Cajun Holy Trinity also build deep flavors. They use similar vegetable mixes. This creates a delicious base for dishes.
Bone-in meat also enhances taste. It makes tough cuts tender and flavorful. This works well in slow-cooked dishes.
The Role of Herbs and Spices
Cooking with herbs and spices in braising adds layers of flavor. Thyme and bay leaves are favorites. They give a unique taste to dishes.
Adding spices like cloves changes the flavor. Each spice has its own special touch. This makes the dish stand out.
The right seasonings can turn simple meals into feasts. It’s all about mixing flavors well. This makes your cooking memorable.
| Technique | Key Components | Effect on Dish |
|---|---|---|
| French Mirepoix | Onions, Carrots, Celery (2:1:1 ratio) | Builds a flavorful base |
| Italian Soffritto | Onions, Carrots, Celery (2:1:1 ratio) | Enhances depth of sauce |
| Cajun Holy Trinity | Onions, Celery, Green Bell Peppers (1:1:1 ratio) | Imparts regional flavors |
| Herbs & Spices | Thyme, Bay Leaves, Rosemary, Cloves | Adds layers of flavor |
Equipment You’ll Need
For braising, the right gear makes a big difference. Here, we’ll look at the must-have items and some optional ones that can boost your cooking.
Must-Have Cookware for Braising
A good braising setup begins with a heavy-bottomed pot or Dutch oven. Brands like Le Creuset and All-Clad are top picks. You should also have a stock pot, sauté pan, and saucepan ready. A kitchen scale for exact measures is key for consistent results.
Optional Tools to Enhance Your Braising
Beyond the basics, certain tools can improve your braising. A meat thermometer checks if the meat is just right. Silicone spatulas protect your pans while stirring. Good knives, like a chef’s, paring, and serrated knife, make prep easier. Also, using the right sized pans, such as those from HexClad that handle up to 500 degrees, avoids overcrowding and cooks evenly.
| Essential Cookware | Optional Tools |
|---|---|
| Heavy-Bottomed Pot/Dutch Oven | Meat Thermometer |
| Stock Pot | Silicone Spatulas |
| Sauté Pan | Quality Knives (Chef’s, Paring, Serrated) |
| Saucepan | Kitchen Scale |
Preparing Your Ingredients
Getting your ingredients ready is key for a great braised dish. This means planning how you cut meat and prepare veggies. Doing this makes sure your meal is full of taste and keeps its texture. We’ll show you how to get meat and veggies ready for braising.
Steps for Prepping Meat
Pick the right meat cuts for braising. Use tougher cuts like chuck roast, pork shoulder, and lamb shanks. They become tender after cooking slowly because of their connective tissues. When cutting meat, make all pieces the same size. This helps them cook evenly during braising.
| Meat Cut | Ideal Size | Cooking Time |
|---|---|---|
| Chuck Roast | 2-3 inches | 2.5 – 3 hours |
| Pork Shoulder | 2-3 inches | 2 – 2.5 hours |
| Lamb Shanks | Whole | 2 – 2.5 hours |
Using bones in your meat can add a rich taste to your meal. Dry the meat well before cooking to sear it better. This adds more flavor. Season well with salt and pepper to add even more taste.
How to Prepare Vegetables for Braising
Getting veggies ready is just as important as the meat. Picking and cutting veggies the right way changes how the meal turns out. Use vegetables like carrots, onions, and celery for braising. Root vegetables are a good pick because they stay solid and add sweetness.

Cut your veggies into big, even pieces so they don’t fall apart while cooking. This way, they’ll add flavor to your braising liquid and still be part of your meal.
| Vegetable | Ideal Size | Cooking Temperature |
|---|---|---|
| Carrots | 1-2 inches | 375 °F |
| Onions | Quartered | Medium Heat |
| Celery | 2-inch pieces | Medium Heat |
By doing these steps right, your meat and veggies will be perfect for adding flavor and texture. Good cutting meat and vegetable prep are the start of a great braise. This careful prep moves your dish from good to amazing.
The Braising Process Step-by-Step
Braising combines dry and wet heat to make tough meat soft and tasty. By braising, you can make your food flavorful and tender.
Browning the Meat
Begin by heating oil in a heavy pot until it’s hot. Sear the meat for 3-5 minutes on each side to get a golden crust. This is key for a rich taste.

Adding the Liquid
After searing, add the liquid for braising. You can use stock, wine, beer, or tomato sauce. The liquid should cover half to three-quarters of the meat. Adding onions, garlic, and herbs will boost flavor.
Cooking Time and Temperature
The right time and temperature are important for the best braising. Usually, you braise at 200°F to 300°F. Cooking times can differ:
- Chicken thighs: 1-2 hours
- Beef chuck roast: 3-4 hours
- Pork shoulder: 4-6 hours
Keep the temperature steady. Too high can make the meat tough. Too low might not make it tender enough. Use a digital thermometer to check the liquid and meat internal temperature.
Once the meat is in the oven, braising needs little effort. Mastering these steps lets you braise with confidence. You’ll get tender, tasty meat every time.
Popular Braising Recipes
Find out how braising recipes make cooking simple yet full of flavor. They are perfect for any cook, beginner or expert. These dishes teach you the art of braising.
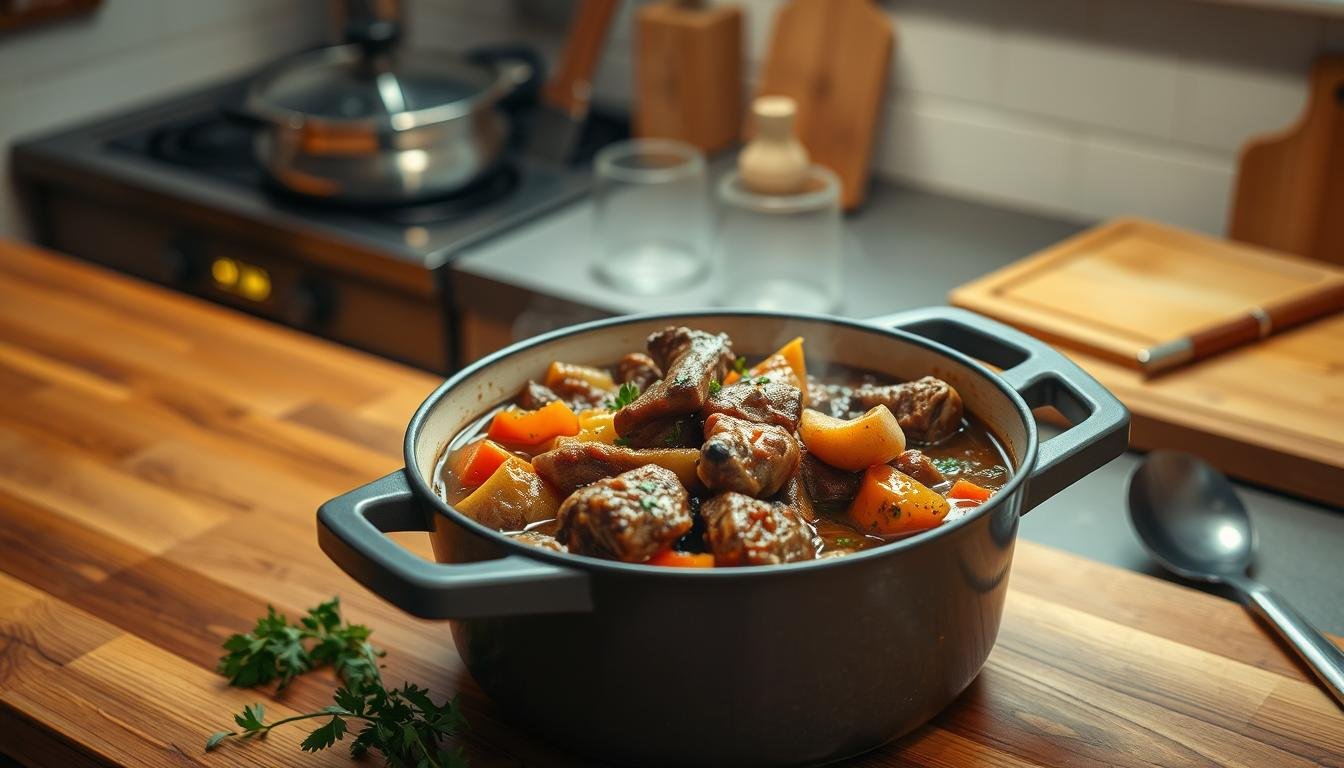
Classic Braised Beef
Braising beef makes it soft and full of taste. It cooks slowly at low heat for 1.5 to 3 hours. This method makes the meat tender and adds delicious flavors from the liquid.
Use bone-in meats for better taste. The beef should be partly covered by the liquid. Red wine or beef stock as the liquid improves the dish.
Most of the work is done without your help, so you can do other things. It’s great for having guests, as it cooks while you get the rest of the meal ready.

Braising is also cheap. It turns less pricey beef cuts into tasty meals. Serve with mashed potatoes or roasted veggies for a cozy and budget-friendly dish.
Braised Chicken with Herbs
For chicken lovers, braised chicken with herbs is a treat. Herbs like rosemary, thyme, and sage make the chicken aromatic and tasty.
Chicken takes less time to braise than beef, usually 1.5 to 2 hours. Half to three-quarters of the chicken should be in the liquid. White wine or chicken stock adds extra flavor.
This method is good for parties because it makes a lot of food on a budget. The chicken stays juicy and tender, pleasing everyone.
Pair your chicken with root veggies and herbs for better texture and taste. Cooking with herbs also brings more nutrition to your food.
Choosing beef or chicken braising recipes adds both simplicity and elegance to your cooking.
Troubleshooting Common Braising Issues
Braising is a great way to cook, but it can be tricky. You might end up with dry meat or a watery sauce. Here are some tips to help you fix these issues and make your dishes tasty.
Dry or Tough Meat Solutions
Sometimes, braised meat turns out dry or tough. This often happens if it’s cooked too long or not long enough. Braising needs 1.5 to 3 hours to make meat like chuck roast tender. Make sure the meat is half to three-quarters covered in liquid. This keeps it from getting dry.
Choosing cuts with bones can also help. Bones add moisture and flavor. Cooking slowly at a low temperature makes meat fall-apart tender.
Overly Watery Braise Fixes
A watery braise can be a letdown. It usually means there’s too much liquid or it wasn’t reduced enough. To fix it, let the sauce simmer without a lid until it thickens. You can also thicken the sauce with cornstarch or a roux. This makes the flavors richer and the texture better.
Below is a table that shows why meat can turn dry or why your braise might be watery. It includes what you can do to fix these problems:
| Issue | Possible Cause | Solution |
|---|---|---|
| Dry or Tough Meat | Incorrect cooking time or temperature | Ensure 1.5 to 3 hours cook time; keep temperature low and slow |
| Dry or Tough Meat | Insufficient liquid | Submerge 50% to 75% of meat in braising liquid |
| Dry or Tough Meat | No bone-in cuts | Use bone-in cuts to add moisture and flavor |
| Watery Braise | Too much liquid at the start | Balance liquid-to-solid ratio |
| Watery Braise | Insufficient reduction | Increase uncovered simmering time for reduction |
| Watery Braise | Thinned liquid | Thicken with cornstarch slurry or roux |
These tips can help fix common braising problems. This will make your meals tender and full of flavor. Keep practicing, and pay attention to details to get better at braising.

Storing and Reheating Braised Dishes
Storing braised dishes right keeps them tasty and tender. Know how to reheat them well. This means you can enjoy your meal again, just as much.
Best Practices for Refrigeration
First, cool your braise well before it goes into the fridge. Once it’s cool, put it in airtight containers. This keeps it moist and tasty.
Braising means slow cooking it several ways. It’s a key part of Persian cooking. Many cooks, about 75%, suggest using airtight containers. This keeps the flavor and tenderness.
Keep these refrigeration tips in mind:
- Keep braised meat in airtight containers below 40°F.
- Eat chilled braised dishes in 3-4 days.
- Wrap well in plastic then foil to freeze.

| Method | Preservation Duration | Details |
|---|---|---|
| Refrigerating | 3-4 days | Cool to room temperature, store in airtight containers |
| Freezing | Up to 3 months | Wrap in plastic and foil, thaw in fridge for 2 days before reheating |
| Vacuum Sealing | Up to 5 times longer | Effective for long-term storage by minimizing moisture loss |
Tips for Reheating Without Drying Out
To keep braised meat tender and tasty, reheat it gently. Warm your oven to 350°F. Put the meat in a covered pot to keep it moist. Heat for about one hour. Check its temperature. It should be at least 165°F, says the USDA.
Here are more tips to keep your meat juicy:
- Use a covered pot or slow cooker to avoid dryness.
- Add some broth to keep it moist.
- Let the meat rest for 10-15 minutes after warming up.
Follow these steps for storing and warming up braised dishes. This way, they’ll always taste great.
Wrapping Up Your Braising Journey
Reflecting on your braising journey, you’ve learned a lot. You know the basics and the special tricks. Things like searing, deglazing, and slow cooking made your dishes juicy and tasty.
Encouragement for New Braisers
If you’re new to braising, keep trying and experimenting. Use different meats, liquids, and spices. Every try helps you get better and adds to your kitchen skills. Remember, the right pot and knowing about heat and time are key.
Next Steps in Your Cooking Adventure
Now, think about trying new cooking ways. You can bake, sauté, and simmer with a Dutch oven. Learning about even heat, handling wind outside, and using coals well will improve your dishes. Whether it’s a tender brisket or a hearty stew, you’ll make it special. Keep exploring and being creative in cooking.