Grilling Vegetables: A Beginner’s Guide
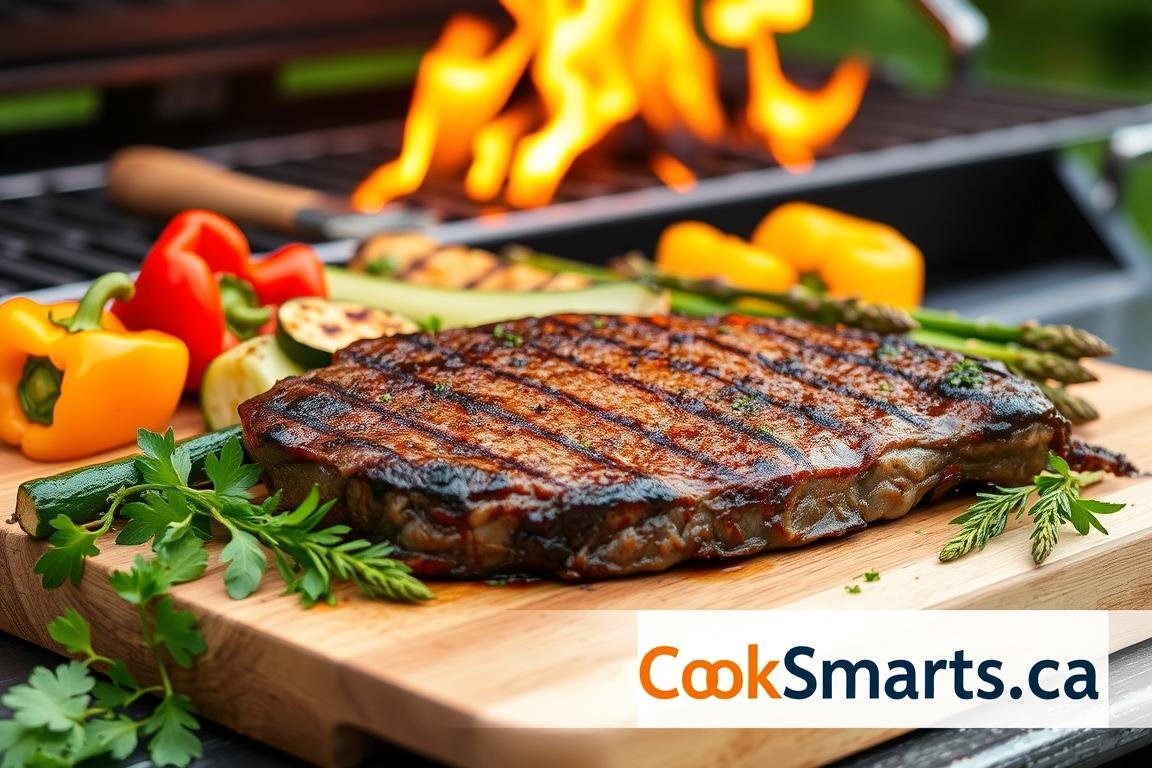
Have you ever thought about grilling steak like the experts in New York City? Imagine a thick, juicy steak, perfectly seasoned and cooked. It’s so good, it could compete with places like Omaha Steaks. Now, think about making that delicious steak in your own backyard. By following this beginner’s guide, you can start your journey to becoming a grill master.
First things first, you need to know about selecting meat with the right marbling. Whether you choose USDA Prime or Wagyu, picking the right cut is key. Knowing how to prepare it is just as important. This includes letting it reach room temperature and understanding how salting affects it. By learning these tips, you’ll grill a steak as good as any top restaurant.
Key Takeaways
- Learn the importance of selecting high-quality cuts with a desirable marbling score.
- Discover butchers’ tips for personalized cuts to ensure even cooking and optimum taste.
- Master the pre-grilling preparation, from room temperature to the generous salting technique.
- Understand the nuances of cooking methods, from grilling to pan searing, in creating the perfect steak.
- Find out why resting your steak post-grilling is crucial for maintaining juiciness.
- Enhance your final product with expert seasoning advice for a steakhouse-style finish.
Introduction to Grilling the Perfect Steak
Learning to grill the perfect steak at home brings the joy of restaurant-quality meals to your comfort. Grilling tips and the right gear, like Traeger Grills and Weber Kettle, turn cooking into an art. This art is perfected right in your backyard.
Why Grill Steak at Home?
Picture this: your steak sizzles as it grills, filling the air with appetizing smells. This can happen in your outdoor kitchen. Grilling at home lets you pick your favorite cuts and how well done you like them. You can also try different seasonings. Using great grills like Weber Kettle or Traeger Grills gives your steak a perfect char and flavor.
Benefits of Cooking Steak Like a Pro
With the right grilling tips and quality grills like Traeger and Weber Kettle, every steak comes out great. These tips include heating the grill high for a crispy crust, flipping the steak just right, and letting it rest. Resting the steak makes sure all the juicy flavors spread out evenly.
This careful method makes each meal a luxury. The freedom of grilling outdoors and enjoying a perfect steak is unbeatable. Use top equipment like Traeger Grills and Weber Kettle, to grill like a professional chef.
Selecting the Prime Cut
Starting your journey to the perfect steak means picking the right cut. Whether it’s a beef loin or another top-notch choice, knowing the different steak cuts is key. This way, you can pick quality meat and cook it to perfection using tools like food temperature probes.
Steak Cuts and Quality Grades
Standing in front of various options at the butcher or market can be overwhelming. Understanding beef grades like Select, Choice, and Prime is critical. Prime grade, with its rich marbling, offers tenderness and flavor, ideal for grilling.
For example, the ribeye, while fatty and prone to flare-ups, is flavorful and loved by chefs. On the flip side, the leaner sirloin is healthier but needs careful cooking to stay juicy.
Butcher vs. Supermarket: Where to Buy
Choosing where to buy your steak is as important as choosing the cut. Butchers usually provide quality cuts and helpful advice, whether you want a beef loin or filet mignon. Supermarkets are convenient and offer variety but might lack the specialty products of a butcher’s shop.
Here’s a tip: aim for Choice or Prime grade steaks for a better eating experience. These grades have more marbling and taste. Also, use food temperature probes for precise grilling, ensuring your steaks reach the perfect doneness.
Mastering the perfect steak starts at the butcher’s counter, not just with grilling skills. By choosing wisely and using tools like food temperature probes, every steak will be perfect.

Prepping Your Steak for Excellence
To get that steakhouse quality at home, know the starting steps. They’re key to a great steak. Understanding these basics can make or break your grilling success.
Initial Preparation Essentials
First, let your steak warm to room temperature. This helps it cook evenly. It might take 30 to 40 minutes, depending on its size. For the best cook, choose thick cuts like Rib-Eye or Porterhouse, especially for the reverse sear method. A thickness of at least 1.5 inches is perfect. It gives a nice char without overdoing the inside.
Importance of Cutting and Seasoning
The right steak thickness means even cooking and juicy meat. Uniform thickness is key for methods like reverse sear, for even cooking. After cutting, seasoning is next. The type of salt you use is important. Maldon Sea Salt sticks well and melts evenly. It creates a crisp crust that enhances, not hides, your steak’s flavor.

Using the reverse sear method is about slowly cooking the steak. Then, finish it with a high-heat sear. Here’s how to use Maldon Sea Salt for seasoning:
| Step | Description |
|---|---|
| 1. Let Rest | Let the steak warm up for even cooking. |
| 2. Season | Cover both sides of your steak with Maldon Sea Salt. Make sure it’s even. |
| 3. Reverse Sear | Cook slowly at low heat, then sear at high heat for the perfect outside. |
| 4. Rest Again | Give the steak 5-10 minutes to rest after searing. It makes it juicier. |
Follow these steps for a tender, juicy steak. The Maldon Sea Salt adds the right crunch and flavor.
Mastering the Grill for Steak Perfection
Grilling the perfect steak is both an art and a craft. It requires blending technique with precision. Whether you’re a fan of a classic grill char or a skillet’s sear, knowing how each method affects cooking time is key. A good food temperature probe is essential for steakhouse-quality results. Let’s explore techniques that will take your grilling to the next level and ensure every steak is just perfect.
Grilling vs. Pan Searing
Choosing how to cook your steak depends on the taste and crust you want. Grilling gives a unique smoky flavor and a charred crust that can’t be mimicked on the stove. Meanwhile, pan searing in a cast-iron skillet gives you better temperature control. This means an even, consistent sear. Both methods need high heat and a food temperature probe to make sure your steak is cooked perfectly.
The Critical Cooking Temperatures
Getting your steak perfect is all about the internal temperature. Below is a guide on how long and at what temperatures to cook different cuts:
| Cut | Cooking Time per Side | Target Internal Temperature |
|---|---|---|
| Flank Steak | 4-5 min | 135°F |
| Skirt Steak | 3-5 min | 130°F |
| Rib-eye Steak | 4-6 min | 125°F |
| Filet Mignon | 4-5 min | 120°F |
| Strip Steak | 3-6 min | 122°F |
| Sirloin Steak | 4-7 min | 128°F |
| Tri-tip Steak | 4-6 min | 128°F |
It’s key to let your steak rest for 5-10 minutes after cooking. This step spreads the juices, making each bite succulent and tasty. Using a food temperature probe is crucial here. It helps to prevent overcooking, which can make your steak tough instead of tender.

The Art of Nuanced Seasoning
Seasoning is more than just sprinkling salt and spices. It’s an art that lifts the taste and texture of your steak. It brings that top-notch restaurant flavor to your home grill. Knowing the importance of high-quality salts like Maldon Sea Salt for the right seasoning balance is key.
How Salt Works Its Magic
Salting is the first step in grilling steaks. It’s essential for the Maillard reaction, which gives the steak its appealing golden-brown look. Maldon Sea Salt, with its unique flaky texture, sticks well to the steak. It ensures even coverage and dissolves perfectly during cooking.
Unlike fine salt, Maldon Sea Salt stays on the steak’s surface longer. This helps form a great crust without the steak getting too salty inside.
When to Introduce Other Seasonings
Salt should be put on before cooking to boost the steak’s natural flavors. Other spices like black pepper, smoked paprika, or herbes de Provence come later. If you add them too early, especially at high heat, they can burn and taste bitter.
Add these other seasonings after the first flip on the grill. This way, the flavors blend well without getting scorched.

Knowing these seasoning tips will up your grilling game. It makes a simple meal into a special dining experience. Remember, the right timing and quality of seasonings like Maldon Sea Salt can take your steak from good to amazing. Keep these tips in mind for a tasty result next time you grill.
Bringing Flavor to the Forefront
To make your grilling better, the taste of your steak is very important. The marbling score of the meat matters a lot because it makes the steak tastier and softer. A steak with a lot of marbling keeps its juices when you cook it, making it juicier. Let’s see how marinating and adding special toppings can make your Beef Loin a dish to remember.
Experimenting with Marinades
Marinating the Beef Loin makes it softer and adds rich flavors. It’s important to choose marinade ingredients carefully. They should enhance the meat’s natural tastes without hiding them. You should use things like citrus, herbs, and soft spices that make it richer without covering up its natural flavors.
Classic and Innovative Toppings
After marinating, think about toppings that can make the steak’s flavor even better. A bit of herbed butter or some fresh parsley can add freshness and richness. This makes a well-marbled Beef Loin taste better. Or, for something different, try adding homemade chimichurri or balsamic glaze. These options create a strong contrast that highlights the steak’s own flavors.

Looking for the perfect steak, we can compare different grilling methods:
| Grilling Method | Temperature Reached | Steak Internal Temp | Notes |
|---|---|---|---|
| Gas Grill | 550 degrees | 132 degrees | Uniform heat |
| Charcoal Grill (Big Green Egg) | 550 degrees | 136 degrees | Used natural lump charcoal |
| Iron Pan Searing | On 24,000 BTU burner | 125 degrees | Leaf blower used for intense heat. |
Choosing a grilling method is key to flavor development in your Beef Loin. You might pick a traditional way, like searing in an iron pan on a strong burner. Or maybe you’ll try something new with a gas grill. Either way, the goal is to cook the marbling just right. This complements the marinades and toppings you’ve chosen.
The Crucial Steps of Cooking Steak
Perfect steak at home needs precision and the right method. It goes beyond choosing the cut or seasoning. It’s about the cooking technique. Knowing how to prepare steak well will boost your cooking skills.
Searing Techniques for a Perfect Crust
The reverse sear method is a top technique for getting that steakhouse crust. Start by cooking the steak on low heat. This gently raises its internal temperature. Then, sear it on a very hot surface for a crispy outer crust. This technique works great, especially with thick cuts like a 1 1/2 inch ribeye. It ensures even cooking and a great texture.

To cook precisely, it’s wise to use food temperature probes. These tools help you keep an eye on the steak’s internal temperature. This way, you get your steak just right, from rare to well-done. Managing the temperature lets you cook your steak perfectly every time.
Understanding Resting Importance
Resting your steak after cooking is essential. It lets juices spread throughout the meat, making it tender and tasty. A good rest period for a thick steak, like a ribeye, is 15-20 minutes. In this time, the meat’s fibers relax, and juices retreat from the center.
| Doneness | Temperature | Resting Time |
|---|---|---|
| Rare | 130°F | 7 minutes |
| Medium-Rare | 140°F | 7 minutes |
| Medium | 155°F | 7 minutes |
| Well-Done | 165°F | 7 minutes |
A reliable food temperature probe avoids overcooking. Following the right temperatures and rest times ensures a juicy steak. Your steak will be delicious every single time.
Accompaniments That Complement Your Steak
Mastering the perfect steak is about more than grilling. It’s about making a harmonious dining experience. Omaha Steaks knows that good pairings with proteins can make the main dish stand out. It blends flavors that linger long after the meal is done.
Side Dishes to Serve
There are 20 recipes we’ve gathered to make your steak night better. Choices range from the rich potatoes au gratin loaded with cheddar and Gruyère, to the crisp roasted red pepper salad. Each side complements the richness of Omaha Steaks, offering options that are both hearty and light.
Perfect Pairings for a Full Experience
Pairing with proteins means balancing the plate in diet and satisfaction. The sides we suggest add color and variety, and they make each steak bite better. This is thanks to well-chosen ingredients that spotlight the main protein.

For guidance, see the table below. It shows popular sides from our recipes with their prep times and main ingredients. This info will help you plan an amazing meal around your Omaha Steaks.
| Dish | Key Ingredients | Preparation Time |
|---|---|---|
| Potatoes au Gratin | Potatoes, cheddar, Gruyère | 20 min |
| Arugula Salad with Citrus | Arugula, mixed citrus, beets | 15 min |
| Broccoli with Blue Cheese | Broccoli, blue cheese dressing | 15 min |
| Charred Broccolini Caesar | Broccolini, chickpeas, Caesar dressing | 15 min |
| Creamed Spinach with Cognac | Spinach, Cognac, Pernod | 20 min |
Whether a crisp salad or creamed veggies are your choice, side dishes will make your Omaha Steaks meal memorable. Every pairing is a chance to celebrate flavor and enjoy each bite.
Learning from the Steakhouses
Top steakhouses have refined their cooking methods over the years. This ensures each steak is perfect. By learning these methods, you can improve your grilling at home. You will also steer clear of common grilling errors.
Key Takeaways from Top Chefs
Steakhouse chefs stress the importance of proper cooking times and heat control. They suggest letting steaks reach room temperature before grilling for even cooking. Knowing how thick and heavy your steak is helps in grilling it just right. Adding melted beef fat after grilling, as done at Peter Luger’s, boosts flavor wonderfully.
Avoiding Common At-Home Mistakes
Many people mess up by not seasoning well or not picking the right cooking times. Experts suggest heating the grill before starting and using a two-zone setup. High heat is for searing and low heat to finish cooking. This approach, recommended by Steven Raichlen, helps prevent burning and ensures a tasty sear.

| Technique | Application | Steakhouse Example |
|---|---|---|
| Marbling | Opt for steaks with good marbling for enhanced flavor. | Such steaks are usually the prime choices in steakhouses. |
| Seasoning | Season with kosher or sea salt and fresh cracked black pepper. | Simple yet effective, it’s the go-to for many steakhouse chefs. |
| Resting | Let your steaks rest to reabsorb juices. | This practice ensures a juicy steak, as seen in upscale steakhouses. |
| Internal Temperature | Check doneness with a meat thermometer. | Steakhouse chefs closely watch internal temperatures to prevent overcooking. |
| Crosshatch Marks | Give your steak beautiful marks by rotating it 90 degrees on the grill. | This technique adds to the steak’s visual appeal. |
Exploring these grilling tips can elevate your backyard cooking. Great grilling combines skill, timing, and preparation. Let these insights help you make your next steak a delicious success.
The Significance of Beef Quality and Aging
Starting your steak mastery journey, it’s key to grasp beef quality and aging’s importance. High-grade beef, like USDA Prime, is known for its tenderness and taste. This is thanks to chefs using specific aging methods.
The Impact of Beef Grades
USDA Prime is the top tier of beef quality in the U.S. It represents a tiny portion of all graded beef. It’s known for its rich marbling, boosting both steak’s juiciness and taste. Choosing USDA Prime means you’re going for an unmatched food experience.
The Role of Aging in Flavor
Aging beef, especially using the dry-aging technique, is crucial for top-notch beef. It enhances the beef’s natural flavors and makes it softer. So, the meat you get is both tasty and tender.

The table below outlines key aspects of the aging process, illustrating why this method is a staple for premium steak preparation.
| Aging Type | Duration | Resulting Flavor | Weight Loss |
|---|---|---|---|
| Dry-aged | 28-30 days | Intensified, succulent | Approx. 10% |
| Short ribs aging | 5 days | Rich, deeper taste | Minimal |
| Rib-eye aging | 10 days | Enhanced umami and richness | Approx. 10% |
Knowing these details helps you shop smarter and cook like a steakhouse pro. The best steak is crafted with knowledge about USDA Prime grades and precise aging.
Your Pathway to Grilling Mastery
Becoming a grill master is more than just lighting up the grill. It’s about learning the right techniques and knowing how to control the heat. You also need the best tools, like the Weber Kettle. It’s not all about how you grill, but what you use to grill with too.
Perfecting Your Personal Grilling Technique
Learning and practicing are key to perfecting your grilling technique. Knowing how heat impacts meat is essential. For the best medium-rare steak, heat your grill between 135ºF-140ºF and keep the temperature steady. The Weber Kettle is ideal for this, thanks to its even heat.
Here are some useful grilling tips:
- Always preheat your Weber Kettle for 10-15 minutes to reach the ideal temperature.
- Check meat doneness with a thermometer to keep it juicy.
- Let your steak rest for 5 to 10 minutes after grilling to even out the juices.
Understanding the Relationship Between Fire and Steak
The bond between fire and steak is key in grilling. The fire type and how you handle it can change a steak’s texture, taste, and doneness. A great sear needs high heat to keep flavors locked in. Experts suggest searing each side for 2 minutes and the edges for 1 minute. This traps the juices inside before resting the steak.
Different cuts of steak might need different heat levels. For example, a dense filet mignon, which costs about $30 to $45 per pound, does best with direct high heat. Avoid flipping it too much, or you might spoil the sear.
The Weber Kettle gives you better temperature control, thanks to its adjustable vents. This lets you cook various cuts perfectly by managing the heat. This makes all the difference in the results.
Conclusion: Savoring Your Steakhouse-Style Success
As your home grilling journey comes to an end, look back on what you’ve learned. You’ve mastered different cuts, from the rich Ribeye to the tender Filet Mignon. Marbling is your secret weapon, making every bite juicy and tender.
Whether you’ve wet-aged your beef or explored dry-aging like the pros, you’ve aimed high. Restaurants like Peter Luger have shown what excellence looks like. Now, you’re bringing that excellence home.
Elevating Home Grilling to New Heights
Perfect steaks are more than just the right heat. They’re about mixing fire with flavor. Using your Traeger Grills, you’ve added smoky touches and caramelized flavors. These are the tastes you find in acclaimed spots from Beverly Hills to Buenos Aires.
Mastering the flip for a superb medium-rare steak shows your skill. Letting your Omaha Steaks rest assures they’re juicy and delicious. Each action is a step toward grilling perfection.
Celebrating the Steak Experience
Your choice of seasonings has elevated Omaha Steaks to a new level. Even a simple salt and pepper duo can work wonders. But it’s the pairing with fine wine that truly completes the dish.
With every sizzle and sear, remember you’re not just making a meal. You’re celebrating a victory in culinary art. You’ve earned the right to be proud, savoring steakhouse quality from your own grill.